How To Splint a Finger
Finger splints immobilize a finger after an injury 1. They can be used for anything from a slight sprain to a broken bone. Immobilizing the finger reduces the amount of stress put on it, which in turn speeds the healing process. Finger splints can be put on in a matter of minutes and require no special training to do so 1. Next time you have a minor finger injury, save yourself a trip to the doctor by putting on your own splint.
If you are experiencing serious medical symptoms, seek emergency treatment immediately.
Decide which type of finger splint is best for your particular injury. Curved splints are best for fractures, dislocations and breaks 1. Straight splints are best to use for injuries to the fingertip 1.
How to Make a Splint for a Toe
Learn More
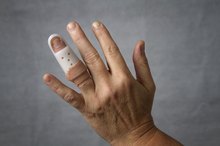
Put the splint on your finger carefully. Do not try to bend or straighten the finger more than it wants to. Applying too much pressure to the finger can worsen the injury. If necessary, bend the splint slightly so it fits comfortably on your finger.
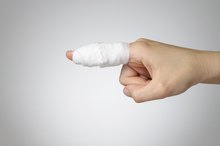
Wrap at least three layers of medical tape around the tip and the base of your finger. The tape needs to be tight enough that the splint cannot move around, but not so tight that your finger won't maintain good circulation. Do not put the tape directly over an open wound.
Types of Finger Splints
Learn More
Tape your injured finger to the finger directly beside it to immobilize it even more. The thumb is the obvious exception to this rule.
Leave the splint on until the injury heals. Replace the tape daily to ensure it sticks at all times.
Tips
Ask your doctor if you are unsure about what type of splint to use.
See a doctor if you think you have a dislocated or broken a finger.
If a finger splint is unavailable, put two twigs or small sticks on either side of the finger and secure them in place with a shoestring. It is best not to use this as a long-term treatment.
Related Articles
How to Make a Splint for a Toe
Learn More
Types of Finger Splints
Learn More

Rehabilitation Exercises for a Dislocated Finger
Learn More

How to Increase Flexibility in My Big Toes
Learn More
4 Ways to Stabilize and Tape Broken Fingers
Learn More

How to Splint a Strained Thumb
Learn More
How to Tape Injured Thumbs
Learn More

What Are the Different Types of Splints?
Learn More
Recovering From Finger Surgery
Learn More
How to Recover From a Torn Hand Ligament
Learn More
References
- Homemade Splints
- Carruthers KH, O'reilly O, Skie M, Walters J, Siparsky P. Casting and splinting management for hand injuries in the in-season contact sport athlete. Sports Health. 2017;9(4):364-371. doi:10.1177/1941738117700133
- Freiberg A. Management of proximal interphalangeal joint injuries. Can J Plast Surg. 2007;15(4):199-203. doi:10.1177/229255030701500407
- Sadura-sieklucka T, Sokołowska B, Prusinowska A, Trzaska A, Księżopolska-orłowska K. Benefits of wrist splinting in patients with rheumatoid arthritis. Reumatologia. 2018;56(6):362-367. doi:10.5114/reum.2018.80713
- Spies CK, Langer M, Hahn P, Müller LP, Unglaub F. The treatment of primary arthritis of the finger and thumb joint. Dtsch Arztebl Int. 2018;115(16):269-275. doi:10.3238/arztebl.2018.0269
Tips
- Ask your doctor if you are unsure about what type of splint to use.
- See a doctor if you think you have a dislocated or broken a finger.
- If a finger splint is unavailable, put two twigs or small sticks on either side of the finger and secure them in place with a shoestring. It is best not to use this as a long-term treatment.
Writer Bio
Kenneth Coppens began his freelance writing career in 2008. His passions in life consist of extensive personal research on food, gardening and finding natural and eco-friendly alternatives to nearly all aspects of life.