One Touch Ultra 2 Instructions
Turning the Meter On
There are 2 ways to turn on your One Touch Ultra 2 blood glucose meter. You can activate the unit either by pressing and holding the "OK" key for 2 seconds or by inserting a test strip into the top of the meter. Test strips should be inserted into the test port with the contacts at the bottom of the strip facing you.
Checking the Code
How to Calibrate a Blood Glucose Monitor
Learn More
After your meter turns on, it should show a code number in the display. This code number must match the number printed on the container your test strips came in. If it does not you may not get an accurate blood glucose reading. If the code number on your test strip vial does not match the code on the meter display, or if your meter is showing "--" rather than a number, use the up and down arrow keys to select the proper number. When you get to the correct number, simply wait for the meter to show the "apply blood" message.
- After your meter turns on, it should show a code number in the display.
- If the code number on your test strip vial does not match the code on the meter display, or if your meter is showing "--" rather than a number, use the up and down arrow keys to select the proper number.
Obtaining the Blood Sample
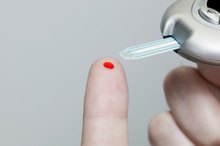
Use the lancet provided with your One Touch Ultra 2 meter or the lancet provided by your doctor to obtain a blood sample from your finger. Obtaining the sample from the side of your finger often causes less discomfort than getting a sample from your fingertip. To prevent soreness of the sample site, it is advisable to use different sample sites. You may also be able to obtain a blood sample from your forearm or palm, but only do this if your doctor has approved these test sites for you. Gently squeeze your finger or other sample site until a round ball of blood forms.
- Use the lancet provided with your One Touch Ultra 2 meter or the lancet provided by your doctor to obtain a blood sample from your finger.
Applying Blood Sample
How to Calibrate the One Touch Ultra Diabetes Monitor
Learn More
Once you have obtained the blood sample, place it next to the top of the test strip in the test port. The blood will automatically be absorbed into the test strip. Continue to hold the sample next to the test strip until the strip shows it is full by filling in all 3 of the confirmation bars. These bars are located on the top edge of the testing strip. It is important to make sure that you allow the blood sample to be absorbed into the strip rather than smearing the blood onto the test strip or pressing the test strip into the sample area. If your meter is no longer showing the "apply sample" message in the window after you have collected the sample, you must remove the test strip and start the testing process again.
- Once you have obtained the blood sample, place it next to the top of the test strip in the test port.
- If your meter is no longer showing the "apply sample" message in the window after you have collected the sample, you must remove the test strip and start the testing process again.
Reading the Results
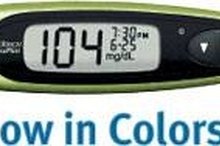
After you apply the blood sample, your meter display will show a count down from number 5 to number 1. The next number that shows in the display after the countdown is your blood glucose reading. If your blood glucose reading is much different from the reading you anticipated, repeat the testing procedure. If the test results are still much different than your expected results you should contact your doctor. Be aware that blood glucose readings can be provided in both mmol/L and mg/dL formats. It is imperative that you understand which reading your doctor wants you to check and to make sure you are getting the desired measurement.
- After you apply the blood sample, your meter display will show a count down from number 5 to number 1.
- If your blood glucose reading is much different from the reading you anticipated, repeat the testing procedure.
Turning the Meter Off
The meter will turn off when you remove the test strip. Holding the "OK" key for 5 seconds will also turn the meter off. If left alone for 2 minutes, the meter will turn itself off automatically.
Warnings
This information is not intended to substitute for the One Touch Ultra 2 manufacturer's instructions or your doctor's advice. While blood glucose meters tend to be reliable and accurate, never trust the meter over your body. If you feel ill or as if something is wrong, it is important to contact your doctor, even if your blood sugar reading is within the acceptable range.
Related Articles
References
- Janapala RN, Jayaraj JS, Fathima N, et al. Continuous glucose monitoring versus self-monitoring of blood glucose in type 2 diabetes mellitus: A systematic review with meta-analysis. Cureus. 2019;11(9):e5634. doi:10.7759/cureus.5634
- American Diabetes Association. The big picture: Checking your blood glucose.
- American Diabetes Association. Blood gluocose monitors. 2020.
- National Institute of Diabetes and Digestive and Kidney Diseases. Continuous glucose monitoring. June 2017.
- Ekhlaspour L, Mondesir D, Lautsch N, et al. Comparative Accuracy of 17 Point-of-Care Glucose Meters. J Diabetes Sci Technol. 2017;11(3):558-566. doi:10.1177/1932296816672237
- U.S. Food & Drug Administration. Self-monitoring blood glucose test systems for over-the-counter use. Updated February, 8, 2018.
- Joslin Diabetes Center. Plasma glucose meters and whole blood meters. 2017.
- National Institute of Diabetes and Digestive and Kidney Diseases (NIDDK). Blood glucose control studies for type 1 diabetes: DCCT and EDIC.
Writer Bio
Writing professionally since 2008, Michelle Miley specializes in home and garden topics but frequently pens career, style and marketing pieces. Her essays have been used on college entrance exams and she has more than 4,000 publishing credits. She holds an Associate of Applied Science in accounting, having graduated summa cum laude.


