How to Make Homemade Porcelain Veneers pictures
Ever need to fix a broken tooth--or simply want to improve your smile--but you don't have dental insurance and can't afford a porcelain dental veneers just now? If you are good at working with details, here is an inexpensive way to make temporary porcelain veneers at home.
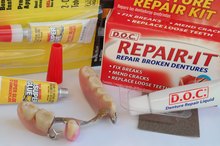
Purchase a Den-Sure denture repair kit at your local drug store. I found a couple different brands at Rite-Aid. These should include several top teeth and several bottom teeth as well as a combination liquid/powder that can be made into a hard glue.
How to Remove Tooth Tartar at Home
Learn More
Choose a tooth that roughly matches your broken tooth in size (you could also do your own "teeth whitening" with veneers). If there's not an exact match, it's better to choose one that's slightly larger (wider) than your broken tooth rather than narrower.
With a dremmel and a small bit (I used a diamond burr bit with a rounded tip), begin to sand the temporary veneer down to the size of the tooth it will fix. You can use some of the wax in the kit to secure the temporary tooth for easier handling.
How to Fix a Chipped Tooth Without Going to the Dentist
Learn More
Keep grinding the temporary dental veneer down and testing it on your broken tooth until it fits over the tooth.
Now grind the temporary veneer a little further, making room for the glue that will secure it to your broken tooth.
Mix the pink powder with the liquid (both contained in the Den-Sure kit) as directed in the kit instructions. Apply this paste to the temporary veneer and press veneer to your broken tooth. Allow ten minutes to dry. You may alternately use super glue to afix the temporary venneer to your broken tooth. Remember: this is a temporary fix. Only a dentist can make you a permanent veneer.
Don't forget to take pictures and post in the "I Did It" section! Enjoy your dental work savings!
Tips
Applying a hot washcloth to your tooth will speed the drying time.
Related Articles
Tips
- Applying a hot washcloth to your tooth will speed the drying time.
Writer Bio
This article was written by the CareerTrend team, copy edited and fact checked through a multi-point auditing system, in efforts to ensure our readers only receive the best information. To submit your questions or ideas, or to simply learn more about CareerTrend, contact us [here](http://careertrend.com/about-us).


